Mission: Annihilation
Deployment: Pitched Battle
Points: 1000
Table-Size: 4×4
Report By: Brother Brutus
Background:
The Assault on Black Reach in 855M41* is one of the most well-known battles of the late 41st Millennium (as described in White Dwarf # 344, September 2008). A lesser-known but still crucial encounter between the Ultramarines and the Orks of Waaagh! Zanzag was the nearby Battle of Ashfall Pass. Ashfall Pass is a ravine that leads into the back of the Ork-infested caverns in which Warboss Zanzag had set up his lair. If the pass remains under the Orks’ control, then they can reinforce their units within the cavern at will, making an Ultramarine victory nearly impossible. An expeditionary force of Ultramarines has thus been sent by Captain Sicarius to secure the pass and prevent any Ork reinforcements. Should the Ultramarines fail in Ashfall Pass, then Sicarius and his troops within the caverns are heading to their doom…
https://wh40k.lexicanum.com/wiki/Assault_on_Black_Reach
Orks Strategy:
Knowing the Ultramarines, they’ll probably opt for a “stand off” strategy – keep their distance and annihilate their foes with ranged weaponry, avoiding melee combat. That being the case, the Orks have chosen several long-range heavy-support units to beat the Marines at their own game: a trio of Big Gunz and a Looted Wagon. These are, however, greenskins, so the rest of their forces are swarms of infantry Boyz intended to swamp the Ultramarines lines and force them into melee combat. A squad of Burna-Boyz will rush in behind the Battlewagon to decimate Ultramarines in close-combat, using their Burnas as power-weapons. All of these units will be led by Warboss Hedstompa in mega-armor, accompanied by four Meganobz, all mounted in a Battlewagon. Waaagh!
Ultramarines Strategy:
The Orks are a “swarm” army, doing best when they can overwhelm their enemies with huge mobs of close-combat models. To prevent this, the Ultramarines will employ long-range weapons as much as possible to take away the greenskins’ main strength. Not one but two Vindicators with demolisher cannons will form the backbone of this tactic, intending to obliterate any Ork mobs that try to close to assault combat with the Ultramarines’ line. Should Ork vehicles get too close for comfort, a Devastator squad with two las-cannons and two missile-launchers stands by to assist the Vindicators. Lastly, a sniper squad of scouts will attempt to pin any approaching mobs so that the two tactical squads can pick them apart with concentrated boltgun fire.
Game Set-Up:
The Orks won the dice-roll to see who goes first. Naturally, they chose to set up first and then go first, wanting to be able to fire at the approaching Ultramarines before the Ultramarines had a chance to start their own attack. The Ultramarines tried to seize the initiative but failed, ensuring that they were in for a rough start…
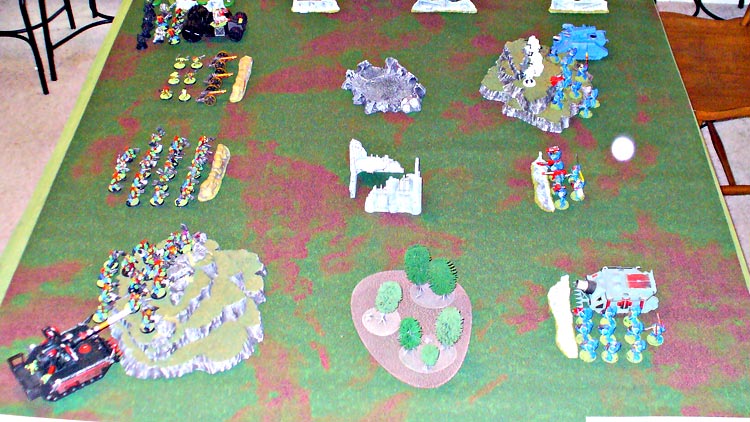
Turn 1
Orks’ Phase:
Warboss Hedstompa advanced forward up the west side of the board in his Battlewagon (with his Meganobz also embarked). The Burna Boyz followed directly behind the Battlewagon, but got left behind and out in the open thanks to a “Run” roll of only 2. The infantry Boyz moved up through the center and east side of the board, running considerably further. The Looted Wagon fired first, its Boom-Gun aimed at the Devastators since it lacked line-of-sight to either of the two Ultramarine vehicles. The shot scattered backwards two inches, still managing to drop a Devastator armed with a missile-launcher. Far worse, however, is that the shot had scattered directly over the Ultramarine captain, causing instant death despite his three Wounds! Normally the Devastator and Captain would have received cover-saves since there were behind cover, but the Boom-Gun’s shot scattered behind the cover, so the blast/damage came from behind the targets, bypassing the cover they would have usually received. A rough start for the Ultramarines, indeed – the Orks not only claim first blood, but also get the game’s first Victory Point, in their very first shot! The three Zzap-Guns shot next, aiming for the closest Vindicator. All three gretchin-crewed guns actually managed to hit the Vindicator, continuing the greenskins’ excellent shooting thus far. The first two failed to even glance the tank’s armor, but the third actually managed to get a “Crew Shaken” result, preventing the Vindicator from firing its Demolisher cannon next Turn!
Ultramarines Phase:
The Space Marines stared in shock as the dust cleared from the Orks’ first Turn – they had already lost their leader, a Devastator Marine, and one of their valuable tanks was out of action for this Turn, all thanks to uncommonly-excellent greenskin ballistics. Believing the approaching Battlewagon with its five mega-armored Orks as the most pressing threat, the Devastators and the other Vindicator pivoted toward the Ork wagon and fired into its exposed right side, resulting in “Crew Stunned”. The Scouts managed to pin the Zzap Guns with sniper fire, whilst the two tactical squads and the Devastator almost entirely wiped out the center Boyz mob. That mob, despite being reduced from 18 to only 3 Boyz, still managed its Morale Test, and sallied forth undaunted.

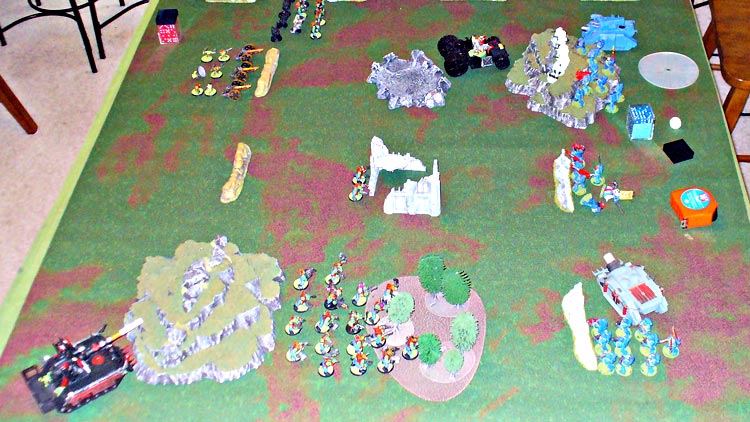
Turn 2
Orks’ Phase:
Hedstompa and his “krew” motored forward at top speed in their wagon, stopping just shy of the Ultramarines’ front line near the snipers, tactical squad “Antonius” and the western Vindicator. Next Turn, their assault would begin in earnest… The two Boyz mobz and the Burna Boyz ran forward, again foregoing shooting. The Big Gunz couldn’t fire thanks to being pinned, and the Looted Wagon’s Boom-Gun managed only to slay a single sniper atop the northwest hill. This was, however, good for the Orks because if the Boom-Gun’s shot had scattered a few more inches in the direction it rolled, it would have landed on Hedstompa’s Battlewagon!
Ultramarines Phase:
Again, no movement, and in the shooting phase absolutely nothing happened except one of the Boyz in the center mob was slain by heavy-bolter fire despite being in the cover of the ruins. This reduced that mob from a meager three to a paltry two, which again made their Morale Test and stayed in the fight, still depriving the Ultramarines of any victory points. Both Vindicators and the Devastators all failed to do anything to the ork wagon except score a useless “Crew Stunned” result. The Emperor’s finest were beginning to wonder if the Emperor had abandoned them… (Note: This was all due to horrendous dice rolls – not poor tactics. C’est la guerre!)
Turn 3
Orks’ Phase:
The Burna Boyz surged forward, finally catching up to Hedstompa’s wagon thanks to a 6″ Run move. The undamaged foot-slogger mob did likewise, getting perilously close to Ultramarine eastern flank. The mob with only two Boyz remaining cleverly chose to remain in the ruins – they knew that they couldn’t contribute much firepower anymore, but could at least prevent themselves from becoming a victory-point for the Ultramarines. Hedstompa and his mega-armored krew at last disembarked from their seemingly-indestructible Battlewagon and prepared to lay waste to the Imperium’s defenders atop and behind the northwestern hill. For shooting, Hedstompa and his krew managed to slay a single Scout with their twin-linked shootas. Elsewise, however, the Orks’ uncanny luck failed at last, not scoring a single wound on any Astartes model. It was in assault that things really got interesting. Hedstompa slammed into the three remaining Scouts and sliced them to bloody ribbons. His four mega-armored Nobz likewise butchered four of squad Antonius, who were forced to fall back. They rolled 12″ for their fall-back distance, putting them off the table, thus wiping out all of Squad Antonius. That was two more Ultramarine units destroyed, giving the Orks three total victory points to the Space Marines… zero victory points…
Ultramarines Phase:
To say that the situation was grim for the Ultramarines is an understatement! The rampaging greenskins had flanked them to the northwest with five mega-armored Orks and ten Burna Boyz, and were encroaching en-masse in the northeast. The Marines were left with their two tanks, part of a Devastator squad, and one tactical squad, squad “Bassianus”. The western Vindicator, fearing the approaching mega-armored power-klaws to its rear-facing armor, retreated at cruising speed away from Hedstompa and his krew, hoping to prevent the Orks from getting yet another victory point. In the Marines’ shooting phase, things began to change for the better. A slight deviation on the eastern Vindicator’s Demolisher shot resulted in three mega-armored Nobz being hit (the shot scattered off of Hedstompa by 2″). Two hulking Nobz were slain despite their 4+ cover, but the mob passed its Morale Test thanks to Hedstompa’s Leadership of 9. Fire from the Devastators followed – and all completely missed! Squad Bassianus in the east unleashed rapid-fire bolters and their heavy-bolter on the squad emerging from the woods nearby, dropping nine of them! Even better, the mob failed its Morale Test (double sixes!) and fled 7″ back toward the Ork lines. Still no VPs for the Ultramarines, but at least their survival was a bit less in doubt now.

Turn 4
Orks’ Phase
The Orks began Turn Four on a bad note that turned out good (for them) – the “broken” eastern Boyz mob failed its Morale Test AGAIN (rolling an 11), and fled 7″ again back toward the greenskin deployment zone. Whilst this seemed like a setback at first, it was in a way good fortune since that prevented the Marines from wiping them out and thus gaining a victory point – and by now quite frankly the Orks don’t need any more victory points of their own to win! Ork shooting accomplished nothing, thanks to a mix of bad to-hit and to-wound rolls and decent Astartes armor and cover saves. Ork melee saw Hedstompa and his surviving two Mega-Nobz emerged from the rocky terrain towards the Devastators, but failed to advance far enough to get into base-to-base contact with them. Stopping about 1.5 inches from the Devastators, their charge failed at the worst time…
Ultramarines Phase:
Maneuvering saved the Ultramarines this time – that and finally good dice rolls! The Devastators moved away from Hedstompa and his two Mega-Nobz, whilst Squad Bassianus wheeled around to face either Hedstompa and his remaining krew or fire at the two damnably lucky Boyz hunkering down in the ruins. The western Demolisher wiped out not only two Mega-Nobz, but also took out the Battlewagon too. The second Demolisher wiped out most of the Burna-Boyz, forcing them to retreat thanks to another failed Morale Test. Squad Bassianus finally took down the two Boyz in the ruins with heavy-bolter fire, finally scoring a VP for the Astartes. Still, however, Hedstompa survived…

Turn 5
Orks’ Phase
The remaining Boyz on the eastern side of the table rallied and moved back into the woods toward Squad Bassianus, the Burnaz advanced as well, and Hedstompa ALMOST advanced far enough to assault the Devastators – but not enough. Stopping about 1.5 inches from the Devastators, his charge failed at the worst time… This failure would prove to be fatal to him… In the shooting phase, the Zzap Gunz failed to drop any of the Devastators, also setting up Hedstompa’s imminent demise. Then the Looted Wagon’s Boom-Gun finally hit something without scattering too far. It scattered off of Squad Bassianus westward 7″, taking out the last missile-launcher Devastator – and Hedstompa himself! As Hedstompa gets splattered by his own comrades, this scores a second victory point for the sore-pressed Astartes!
Ultramarines Phase:
Needing one VP to tie the game, or even better hopefully two more VP’s to win it, the Ultramarines poured their wrath out on the Burna Boyz, wiping them out with a combination of Demolisher ordnance and Devastator las-cannons. This scored another VP for the Astartes, resulting in a tie. This was, however, all that they could manage, and with that, the game ended in a draw.

Lessons Learned:
- Consider NOT putting independent characters with squads until absolutely necessary. Not doing this cost the Ultramarines their Captain in the first Turn…
- Likewise, don’t “bunch up” multiple squads together. Doing so is just a huge ordnance-magnet…
- In Annihilation missions, “hide” useless squads (any squad unable to significantly damage the enemy) to prevent them from becoming victory points.
- Flanking for the win! Flanking the enemy’s line with a unit(s) of your own can severely threaten your foe’s army and wreck enemy tactics and plans.
- Take ordnance in your army-lists. The Vindicators saved the day (mostly) for the Ultramarines.
